squashfs固件磁盘空间扩容
Squshfs Overlay扩容带有efi的和不带efi两中
重要提示:
在新版本OpenWrt中,如果你的磁盘是M.2口的SSD,那么你在X86设备上硬盘刷写固件时,很大概率文件系统会被写成f2fs文件系统(不是常规的ext4文件系统),并且无法在线挂载扩容,因此“很多人(M.2固态刷了squashfs固件的玩家)无法实现硬盘扩容”
squashfs文件系统格式
ssd legacy: ext4
ssd uefi : f2fs
PS:经过初步验证,是f2fs文件系统,还是ext4文件系统这取决于你刷机时候,PE启动的引导方式(BIOS或UEFI)!如果你是传统BIOS方式启动的系统(有的叫Legacy),并且格式化硬盘的时候,保存为磁盘格式导致的,分区表类型为MBR格式的分区,写入固件后就是ext4文件系统;如果你是新型UEFI方式启动的系统,格式化硬盘后,分区表类型为GPT格式的分区,写入固件后就是f2fs文件系统!
mbr与gpt引导互转
但是你别担心,他们是可以相互转化的。因此,你需要注意的是:如果你是UEFI格式引导启动的PE,在格式化硬盘后别退出,再做一步“转换分区表类型为MBR格式”就可以规避f2fs文件系统的问题了!
这是分区表类型为MBR格式的分区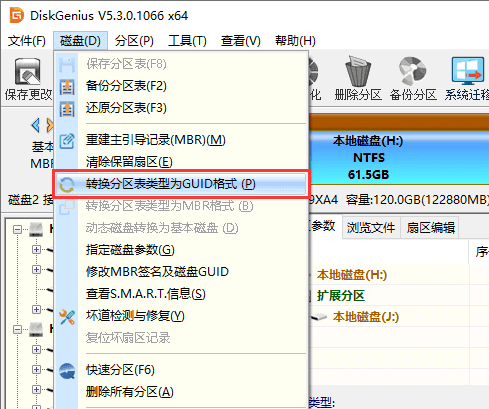
这是分区表类型为GPT格式的分区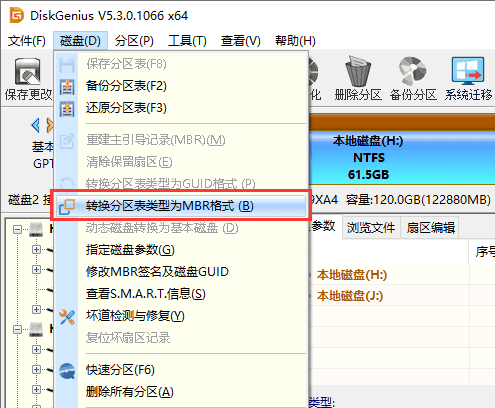
识别文件系统的方法很简单:df -Th或者lsblk -f查看即可辨别
1.安装需要的软件
opkg update

opkg install lsblk fdisk resize2fs losetup blkid f2fs-tools tree
2.查看磁盘分区情况
fdisk -l
...
Device      Start    End Sectors  Size Type
/dev/sda1     512  66047   65536   32M Linux filesystem
/dev/sda2   66048 680447  614400  300M Linux filesystem
/dev/sda128    34    511     478  239K BIOS boot

Partition table entries are not in disk order.
明确了几个点:
1、我们需要操作的整个磁盘叫 /dev/sda ,总容量58.69G(Disk /dev/sda: 58.69 GiB)
2、我们需要扩容的分区是/dev/sda2 ,这里的Start是66048,原始空间300M(/dev/sda2 66048 680447 614400 300M Linux filesystem)
3.使用fdisk命令对磁盘从新分区(扩容)
总的步骤:
fdisk /dev/sda
p
d //删除第二个分区2
n
startnumid //要和之前的保持一致
+5g
n
w
p
1、fdisk /dev/sda扩容磁盘
2、输入p回车(打印磁盘信息),观察后确人:将来要删除的是第二个盘 /dev/sda2(以p打印的顺序为准)
3、输入d回车(删除分区命令),选择2回车(选择删除第二个分区)
4、输入n回车(创建一个新分区),输入2回车(设置盘序号还是刚刚的2号盘),然后必须要注意,之前2号盘的Start是66048,所以新创建的盘的Start也必须是66048然后回车。
输入+5g,代表直接新建分区为5GB(这样写方便,不用计算)
Do you want to remove the signature? [Y]es/[N]o: n(移除之前的标识符这里一定要选n)
打印分区表,确认无误后,输入w(保存,正式写入,并同步分区表)
4.检查新的分区表状态
1、使用fdisk -l列出所有磁盘上的分区表信息,我们看到磁盘分区表已经是5G的空间状态了
2、使用df -Th查看文件系统磁盘空间使用情况
root@ImmortalWrt:~
Filesystem           Type            Size      Used Available Use% Mounted on
/dev/root            squashfs        9.0M      9.0M         0 100% /rom
tmpfs                tmpfs         906.0M      1.1M    904.9M   0% /tmp


/dev/loop0           f2fs          289.1M     63.1M    226.0M  22% /overlay
overlayfs:/overlay   overlay       289.1M     63.1M    226.0M  22% /


/dev/sda1            vfat           31.9M      7.9M     24.1M  25% /boot
/dev/sda1            vfat           31.9M      7.9M     24.1M  25% /boot
tmpfs                tmpfs         512.0K         0    512.0K   0% /dev
/dev/sda1            vfat           31.9M      7.9M     24.1M  25% /mnt/sda1
root@ImmortalWrt:~
我们看到,文件系统并没有正确识别到新分配的overlay的 / 根分区的空间,还是289.1M
5.查看当前挂载的循环设备状态
查看循环设备偏移量OFFSET
losetup // or: losetup -a
root@OpenWrt:~# losetup
NAME       SIZELIMIT    OFFSET AUTOCLEAR RO BACK-FILE DIO LOG-SEC
/dev/loop0         0 116916224         0  0 /sda2       0     512
root@OpenWrt:~# losetup  -a
/dev/loop0: [0015]:110 (/sda2), offset 116916224
结合df-Th命令我们看到,/ 这个挂载点使用了 overlay 文件系统技术,并且要记住“OFFSET的偏移量是9371648”,未来也要一致才可以!
loop 设备 /dev/loop0 被映射到了 /sda2 文件上,也就是说现在/sda2用overlay技术,挂载为/目录
总结
- 只读层:
/dev/root(类型为squashfs)。 - 可写层:
/overlay(类型为f2fs,通过/dev/loop0映射到/sda2文件)。 - 最终挂载点:
/(类型为overlay,整合了只读层和可写层)。
这就是为什么squashfs的文件系统可以有“恢复到出厂设置”功能,而ext4文件系统没法恢复的原理。(因为这个根目录既可以有只读层的数据,又有安装软件,修改配置文件的数据)
6.现在我们要重新挂载刚刚创建好的循环设备,以实现替换的目的
因为刚刚讲了这个/根目录是混合型的,必须精确指明哪里是只读的,哪里是可写的,所以这个“OFFSET的偏移量是9371648”
这里注意区别,/dev/sda2是分区,没有挂载具体位置,/sda2已经挂载在/根目录,
7.为了确保数据的一致性,我们先挂载一下数据,检查一下数据是否存在,在卸载释放资源。因为磁盘刚刚被全删除了,后面重启可能会丢失数据,这样做保险一些。
root@ImmortalWrt:~
root@ImmortalWrt:~
/mnt
├── upper
│   ├── boot
│   ├── etc
│   ├── lib
│   ├── mnt
│   ├── sbin
│   └── usr
└── work
    └── work
8.确认挂载的循环设备的文件系统格式(是f2fs,还是)
blkid
root@ImmortalWrt:/
NAME     FSTYPE   FSVER LABEL       UUID                                 FSAVAIL FSUSE% MOUNTPOINTS
loop0    f2fs           rootfs_data 1858fcd6-7767-11ef-979c-5fec82ce50f5  225.9M    22% /overlay
loop1    f2fs           rootfs_data 1858fcd6-7767-11ef-979c-5fec82ce50f5
sda
├─sda1   vfat           kernel      1234-ABCD                              24.1M    25% /mnt/sda1
│                                                                                       /boot
│                                                                                       /boot
├─sda2   squashfs                                                              0   100% /rom
└─sda128
root@ImmortalWrt:/
9.如果是f2fs的文件系统,执行扩容命令,刷新文件
root@ImmortalWrt:/
Info: Force to resize
Info: MKFS version
  "Linux version 5.15.162 ([email protected]) (x86_64-openwrt-linux-musl-gcc (OpenWrt GCC 12.3.0 r27917-81a1f98d5b) 12.3.0, GNU ld (GNU Binutils) 2.40.0) #0 SMP Thu Jul 18 06:35:54 2024"
Info: FSCK version
  from "Linux version 5.15.162 ([email protected]) (x86_64-openwrt-linux-musl-gcc (OpenWrt GCC 12.3.0 r27917-81a1f98d5b) 12.3.0, GNU ld (GNU Binutils) 2.40.0) #0 SMP Thu Jul 18 06:35:54 2024"
    to "Linux version 5.15.162 ([email protected]) (x86_64-openwrt-linux-musl-gcc (OpenWrt GCC 12.3.0 r27917-81a1f98d5b) 12.3.0, GNU ld (GNU Binutils) 2.40.0) #0 SMP Thu Jul 18 06:35:54 2024"
Info: superblock features = 0 :
Info: superblock encrypt level = 0, salt = 00000000000000000000000000000000
Info: Segments per section = 1
Info: Sections per zone = 1
Info: total FS sectors = 596096 (291 MB)
Info: CKPT version = 43a353a3
Info: Duplicate valid checkpoint to mirror position 512 -> 1024
Info: Write valid nat_bits in checkpoint
[FIX] (move_one_curseg_info:2921)  --> Move curseg[0] 3 -> 10 after 2c00

[FIX] (move_one_curseg_info:2921)  --> Move curseg[1] 6 -> 13 after 2c00

[FIX] (move_one_curseg_info:2921)  --> Move curseg[2] 4 -> 11 after 2c00

[FIX] (move_one_curseg_info:2921)  --> Move curseg[3] 0 -> e after 2c00

[FIX] (move_one_curseg_info:2921)  --> Move curseg[4] 1 -> f after 2c00

[FIX] (move_one_curseg_info:2921)  --> Move curseg[5] 2 -> 14 after 2c00

Info: Write valid nat_bits in checkpoint
Try to do defragement: Done
[migrate_ssa: 272] Info: Done to migrate SSA blocks: sum_blkaddr = 0xe00 -> 0x2200
[migrate_nat: 389] Info: Done to migrate NAT blocks: nat_blkaddr = 0xa00 -> 0xa00
[migrate_sit: 447] Info: Done to restore new SIT blocks: 0x600
[rebuild_checkpoint: 486] Info: Overprovision ratio = 2.150%
[rebuild_checkpoint: 487] Info: Overprovision segments = 55 (GC reserved = 53)
Info: Write valid nat_bits in checkpoint
[rebuild_checkpoint: 603] Info: Done to rebuild checkpoint blocks
[update_superblock: 765] Info: Done to update superblock

Done: 0.799958 secs
root@ImmortalWrt:/
10.如果是ext4文件系统,执行扩容命令,刷新文件
resize2fs /dev/sda
11.扩容后,重启前的最后一件重要的事(有EFI引导的要注意)
如果你的固件是带efi的
 immortalwrt-23.05.3-x86-64-generic-squashfs-combined-efi.img
immortalwrt-23.05.3-x86-64-generic-ext4-combined-efi.img

immortalwrt-23.05.3-x86-64-generic-squashfs-combined.img
immortalwrt-23.05.3-x86-64-generic-ext4-combined.img
确认你的uuid,是sda2的PARTUUID=”cfd7abf3-cf18-4a4a-95e4-46f2013c080f”,
root@ImmortalWrt:/
/dev/loop1: LABEL="rootfs_data" UUID="1858fcd6-7767-11ef-979c-5fec82ce50f5" BLOCK_SIZE="4096" TYPE="f2fs"
/dev/loop0: LABEL="rootfs_data" UUID="1858fcd6-7767-11ef-979c-5fec82ce50f5" BLOCK_SIZE="4096" TYPE="f2fs"
/dev/sda2: BLOCK_SIZE="262144" TYPE="squashfs" PARTUUID="cfd7abf3-cf18-4a4a-95e4-46f2013c080f"
/dev/sda128: PARTUUID="20c60f33-afc6-96e2-ae0b-e001ae609580"
/dev/sda1: SEC_TYPE="msdos" LABEL_FATBOOT="kernel" LABEL="kernel" UUID="1234-ABCD" BLOCK_SIZE="512" TYPE="vfat" PARTUUID="20c60f33-afc6-96e2-ae0b-e001ae609501"
root@ImmortalWrt:/
并修改你的系统启动引导
root@ImmortalWrt:/
把里面的2个uuid都改成,sda2的PARTUUID cfd7abf3-cf18-4a4a-95e4-46f2013c080f
root@ImmortalWrt:/
serial --unit=0 --speed=115200 --word=8 --parity=no --stop=1 --rtscts=off
terminal_input console serial; terminal_output console serial

set default="0"
set timeout="3"
search -l kernel -s root

menuentry "ImmortalWrt" {
    linux /boot/vmlinuz root=PARTUUID=cfd7abf3-cf18-4a4a-95e4-46f2013c080f rootwait   console=tty0 console=ttyS0,115200n8 noinitrd
}
menuentry "ImmortalWrt (failsafe)" {
    linux /boot/vmlinuz failsafe=true root=PARTUUID=cfd7abf3-cf18-4a4a-95e4-46f2013c080f rootwait   console=tty0 console=ttyS0,115200n8 noinitrd
}
root@ImmortalWrt:/
12.执行reboot,重启后生效,检查最后的分区成果!
BusyBox v1.36.1 (2024-07-18 06:35:54 UTC) built-in shell (ash)

.___                               __         .__
|   | _____   _____   ____________/  |______  |  |
|   |/     \ /     \ /  _ \_  __ \   __\__  \ |  |
|   |  Y Y  \  Y Y  (  <_> )  | \/|  |  / __ \|  |__
|___|__|_|  /__|_|  /\____/|__|   |__| (____  /____/
          \/      \/  BE FREE AND UNAFRAID  \/
 -----------------------------------------------------
 ImmortalWrt 23.05.3, r27917-81a1f98d5b
 -----------------------------------------------------
root@ImmortalWrt:~
Filesystem           Type            Size      Used Available Use% Mounted on
/dev/root            squashfs        9.0M      9.0M         0 100% /rom
tmpfs                tmpfs         906.0M    104.0K    905.9M   0% /tmp
/dev/loop0           f2fs            5.0G    162.8M      4.8G   3% /overlay
overlayfs:/overlay   overlay         5.0G    162.8M      4.8G   3% /
tmpfs                tmpfs         512.0K         0    512.0K   0% /dev
/dev/sda1            vfat           31.9M      7.9M     24.1M  25% /mnt/sda1
root@ImmortalWrt:~
我们可以看到,可用空间已经变成了5G,大功告成。
13.有EFI引导的,必须修改引导,没有EFI引导的(传统bios引导的,这取决你当时安装的是什么版本),可以跳过这步,直接reboot,重启后就扩容成功了。
没有efi引导的扩容过程如下ext4文件系统扩容,先摆这里,暂时无时间整理
建议安装的软件
lsblk
fdisk
losetup
resize2fs
tree
可选装的软件(openwrt官方源不提供diskman)
diskman
查看磁盘分区
root@OpenWrt:~
Disk /dev/loop0: 99.81 MiB, 104660992 bytes, 204416 sectors
Units: sectors of 1 * 512 = 512 bytes
Sector size (logical/physical): 512 bytes / 512 bytes
I/O size (minimum/optimal): 512 bytes / 512 bytes


Disk /dev/sda: 58.69 GiB, 63023063040 bytes, 123091920 sectors
Disk model: SanDisk SSD i110
Units: sectors of 1 * 512 = 512 bytes
Sector size (logical/physical): 512 bytes / 512 bytes
I/O size (minimum/optimal): 512 bytes / 512 bytes
Disklabel type: dos
Disk identifier: 0x95a30341

Device     Boot Start    End Sectors  Size Id Type
/dev/sda1  *      512  33279   32768   16M 83 Linux
/dev/sda2       33792 246783  212992  104M 83 Linux
root@OpenWrt:~
删除sda2分区,重新创建一个10G的sda2(开始位置一定是p打印出来的sda2的原始的那个start值33792),不能删除标识符选N,一个也不能错!
root@OpenWrt:~

Welcome to fdisk (util-linux 2.39).
Changes will remain in memory only, until you decide to write them.
Be careful before using the write command.

This disk is currently in use - repartitioning is probably a bad idea.
It's recommended to umount all file systems, and swapoff all swap
partitions on this disk.


Command (m for help): p

Disk /dev/sda: 58.69 GiB, 63023063040 bytes, 123091920 sectors
Disk model: SanDisk SSD i110
Units: sectors of 1 * 512 = 512 bytes
Sector size (logical/physical): 512 bytes / 512 bytes
I/O size (minimum/optimal): 512 bytes / 512 bytes
Disklabel type: dos
Disk identifier: 0x95a30341

Device     Boot Start    End Sectors  Size Id Type
/dev/sda1  *      512  33279   32768   16M 83 Linux
/dev/sda2       33792 246783  212992  104M 83 Linux

Command (m for help): d
Partition number (1,2, default 2): 2

Partition 2 has been deleted.

Command (m for help): n
Partition type
   p   primary (1 primary, 0 extended, 3 free)
   e   extended (container for logical partitions)
Select (default p): p
Partition number (2-4, default 2): 2
First sector (33280-123091919, default 34816): 33792
Last sector, +/-sectors or +/-size{K,M,G,T,P} (33792-123091919, default 123091919): +10g

Created a new partition 2 of type 'Linux' and of size 10 GiB.
Partition

Do you want to remove the signature? [Y]es/[N]o: n

Command (m for help): p

Disk /dev/sda: 58.69 GiB, 63023063040 bytes, 123091920 sectors
Disk model: SanDisk SSD i110
Units: sectors of 1 * 512 = 512 bytes
Sector size (logical/physical): 512 bytes / 512 bytes
I/O size (minimum/optimal): 512 bytes / 512 bytes
Disklabel type: dos
Disk identifier: 0x95a30341

Device     Boot Start      End  Sectors Size Id Type
/dev/sda1  *      512    33279    32768  16M 83 Linux
/dev/sda2       33792 21006335 20972544  10G 83 Linux

Command (m for help): w
The partition table has been altered.
Syncing disks.

root@OpenWrt:~
再次验证
root@OpenWrt:~
Disk /dev/loop0: 99.81 MiB, 104660992 bytes, 204416 sectors
Units: sectors of 1 * 512 = 512 bytes
Sector size (logical/physical): 512 bytes / 512 bytes
I/O size (minimum/optimal): 512 bytes / 512 bytes


Disk /dev/sda: 58.69 GiB, 63023063040 bytes, 123091920 sectors
Disk model: SanDisk SSD i110
Units: sectors of 1 * 512 = 512 bytes
Sector size (logical/physical): 512 bytes / 512 bytes
I/O size (minimum/optimal): 512 bytes / 512 bytes
Disklabel type: dos
Disk identifier: 0x95a30341

Device     Boot Start      End  Sectors Size Id Type
/dev/sda1  *      512    33279    32768  16M 83 Linux
/dev/sda2       33792 21006335 20972544  10G 83 Linux
root@OpenWrt:~
我们可以看到,还是磁盘分区表信息中已经是10G的空间状态了
root@OpenWrt:~
Filesystem           Type            Size      Used Available Use% Mounted on
/dev/root            squashfs        4.3M      4.3M         0 100% /rom
tmpfs                tmpfs         910.1M      1.0M    909.1M   0% /tmp
/dev/loop0           ext4           88.0M      2.2M     78.8M   3% /overlay
overlayfs:/overlay   overlay        88.0M      2.2M     78.8M   3% /
/dev/sda1            ext4           15.7M      5.6M      9.8M  36% /boot
/dev/sda1            ext4           15.7M      5.6M      9.8M  36% /boot
tmpfs                tmpfs         512.0K         0    512.0K   0% /dev
root@OpenWrt:~
我们可以看到,文件系统并没有正确识别到新分配的overlay的 / 根分区的空间,还是88.0M,所以此时我们还需要重启(没有-efi的固件)
root@OpenWrt:~
root@OpenWrt:~

Connection closed by foreign host.

Disconnected from remote host(192.168.1.1) at 11:37:14.
执行reboot重启后,查看一下挂载点,确认是
root@OpenWrt:~
NAME       SIZELIMIT  OFFSET AUTOCLEAR RO BACK-FILE
                                                DIO LOG-SEC
/dev/loop0         0 4390912         1  0 /sda2   0     512
root@OpenWrt:~
查看下磁盘空间,依旧没有识别
root@OpenWrt:~
Filesystem           Type            Size      Used Available Use% Mounted on
/dev/root            squashfs        4.3M      4.3M         0 100% /rom
tmpfs                tmpfs         910.1M     84.0K    910.1M   0% /tmp
/dev/loop0           ext4           88.0M      2.2M     78.8M   3% /overlay
overlayfs:/overlay   overlay        88.0M      2.2M     78.8M   3% /
/dev/sda1            ext4           15.7M      5.6M      9.8M  36% /boot
/dev/sda1            ext4           15.7M      5.6M      9.8M  36% /boot
tmpfs                tmpfs         512.0K         0    512.0K   0% /dev
root@OpenWrt:~
但是没关系,最后执行一次扩容命令即可,扩容成功!
root@OpenWrt:~
resize2fs 1.47.0 (5-Feb-2023)
Filesystem at /dev/loop0 is mounted on /overlay; on-line resizing required
old_desc_blocks = 1, new_desc_blocks = 80
The filesystem on /dev/loop0 is now 10481984 (1k) blocks long.

root@OpenWrt:~
最后检查一遍文件系统空间
root@OpenWrt:~
Filesystem           Type            Size      Used Available Use% Mounted on
/dev/root            squashfs        4.3M      4.3M         0 100% /rom
tmpfs                tmpfs         910.1M     84.0K    910.1M   0% /tmp
/dev/loop0           ext4            9.4G      2.2M      9.0G   0% /overlay
overlayfs:/overlay   overlay         9.4G      2.2M      9.0G   0% /
/dev/sda1            ext4           15.7M      5.6M      9.8M  36% /boot
/dev/sda1            ext4           15.7M      5.6M      9.8M  36% /boot
tmpfs                tmpfs         512.0K         0    512.0K   0% /dev
root@OpenWrt:~
我们可以看到,文件系统已经正确识别到新分配的overlay的 / 根分区的空间已经是9.4G了,扩容成功!